REBA (Rapid Entire Body Assessment) is an ergonomic assessment tool that scores the risk of musculoskeletal disorders from a worker’s whole-body posture. Published by Sue Hignett and Lynn McAtamney in 2000, it scores the neck, trunk, legs, arms and wrists on a one-page worksheet, adds the load, grip and activity, and gives a REBA score from 1 to 15.

This guide walks through the REBA worksheet step by step with a worked example and explains what each REBA score means. Want to skip the math? Our free REBA calculator follows the same 13 steps as this guide and works out the score for you.
Note: This is a long post! If you’d rather work your way through this guide with a PDF file, click here to download step-by-step guides to all of our recommended ergonomic assessment tools.
What is REBA?
The Rapid Entire Body Assessment (REBA) was developed to “rapidly” evaluate the risk of musculoskeletal disorders (MSDs) associated with certain job tasks. It uses a systematic process to evaluate both the upper and lower parts of the musculoskeletal system for biomechanical and MSD risks associated with the job task being evaluated.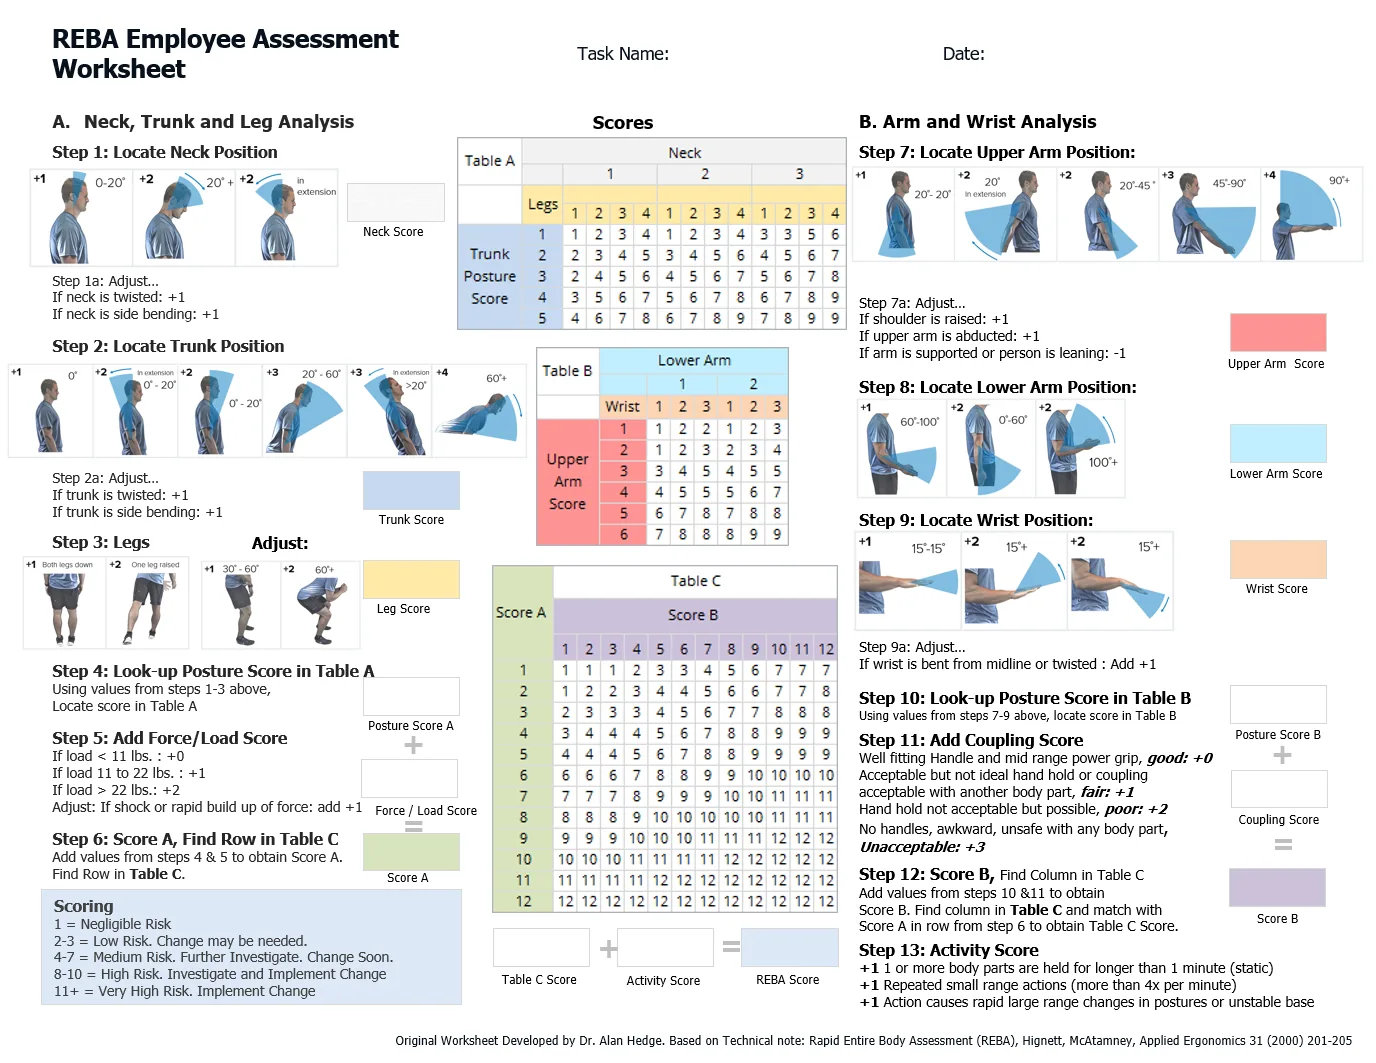
View full size image or download the REBA worksheet (PDF)
A single-page worksheet (above) is used to score the body posture, forceful exertions, the type of movement or action, repetition and coupling, which is how well the hands can grip the load.
What REBA was designed to do
- To provide a simple postural analysis system sensitive to musculoskeletal risks in a variety of tasks.
- To divide the body into segments to evaluate individually with reference to postures and movement planes.
- To provide a scoring system for muscle activity caused by static, dynamic, rapid changing or unstable postures.
- To consider coupling as an important variable in the handling of loads.
- To give an action level output with an indication of urgency.
- To provide a user-friendly assessment tool that requires minimal time, effort and equipment.
REBA limitations
- It does not consider the duration of the task or the available recovery time, and it does not evaluate hand-arm vibration risk.
- It assesses one employee’s worst-case posture at one point in time, so you need to choose representative postures.
- It requires separate assessments of the right and left sides of the body, although in most cases you will be able to quickly tell which side has the greatest exposure to MSD risk.
REBA scores and risk levels
The output of a REBA assessment is the final REBA score: a single number from 1 to 15 that represents the level of MSD risk for the job task being evaluated. Each score falls into one of five risk levels.
| REBA score | Risk level | Action |
|---|---|---|
| 1 | Negligible | No action required |
| 2 to 3 | Low | Change may be needed |
| 4 to 7 | Medium | Further investigation, change soon |
| 8 to 10 | High | Investigate and implement change |
| 11 to 15 | Very high | Implement change |
ErgoPlus also reports a risk index, which is the REBA score divided by 4. The design goal is a risk index of 1.0 or lower, which is a REBA score of 4 or lower.
REBA calculator and software
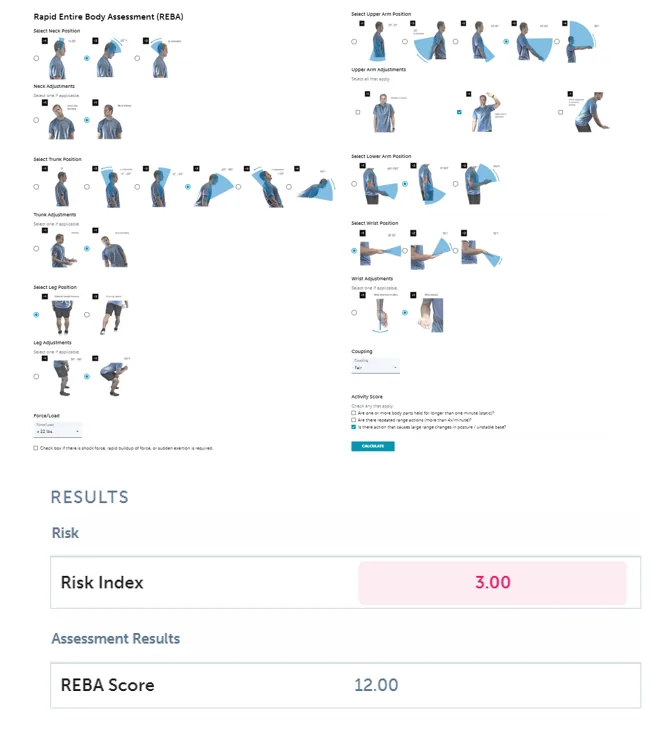
You can score REBA by hand with the worksheet, or let a calculator do the table lookups for you:
- Free REBA calculator: pick the posture pictures for each step and watch the REBA score, risk level and risk index update as you go. Print the result or save it as a PDF.
- REBA software: the REBA calculator in ErgoPlus Industrial saves every assessment, so you can compare jobs, share reports and track improvements across worksites.
How to do a REBA assessment
Get ready
The evaluator should prepare for the assessment by interviewing the worker being evaluated to gain an understanding of the job tasks and demands and observing the worker’s movements and postures during several work cycles. Selection of the postures to be evaluated should be based on 1) the most difficult postures and work tasks (based on worker interview and initial observation), 2) the posture sustained for the longest period of time, or 3) the posture where the highest force loads occur.
The REBA can be conducted quickly, so multiple positions and tasks within the work cycle can usually be evaluated without a significant time/effort cost. When using REBA, only the right or left side is assessed at a time.
After interviewing and observing the worker, the evaluator can determine if only one arm should be evaluated, or if an assessment is needed for both sides.
Measure the body angles
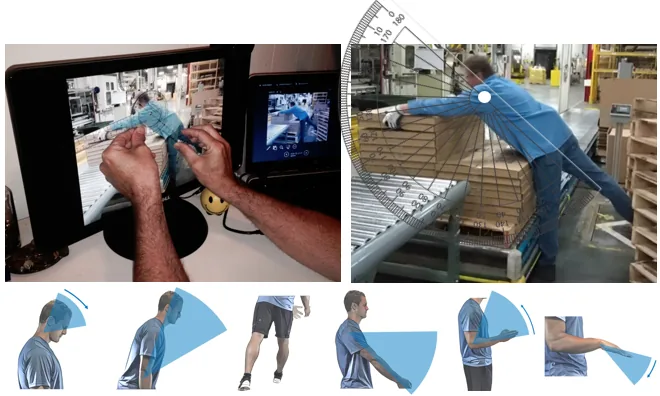
The REBA assessment requires that you determine postural angles of six different body positions. In most cases, you will be able to determine the body position angle in the field as you observe the task. However, we find that it’s very helpful to take pictures or video of the task being performed from several angles if possible. You can then display the pictures on your computer monitor and use a goniometer (as pictured on left) or an overlaid transparent protractor image (as pictured on right) to measure the body segment angles. These methods are both very quick and easy and will give you the assurance that you’ve obtained the correct body position angles for the assessment.
REBA example, step by step
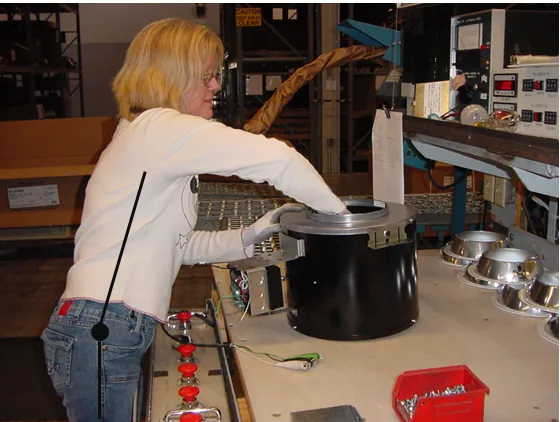
In this example, a worker reaches into a large part on a workbench. Follow along with the worksheet, or open this example in the REBA calculator.
Neck, trunk and leg analysis
Step 1: Neck
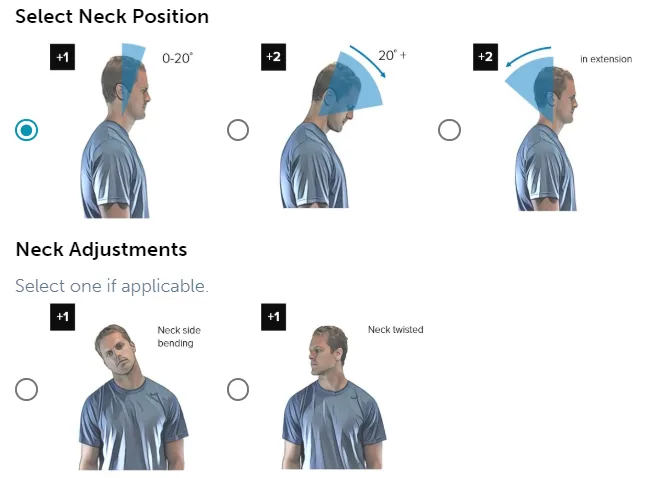
The neck position score will be between 1-3. The score is based on the degree of neck flexion or extension, along with any adjustment for neck twisting or side bending (lateral flexion). Neck flexion is movement of the chin towards the chest from a neutral neck position. Neck extension is moving the chin away from the chest (backwards) from a neutral neck position.
In this example, neck flexion is less than 20 degrees (+1). There is no twisting or side bending required, so no selection is made under neck adjustments.
Step 2: Trunk
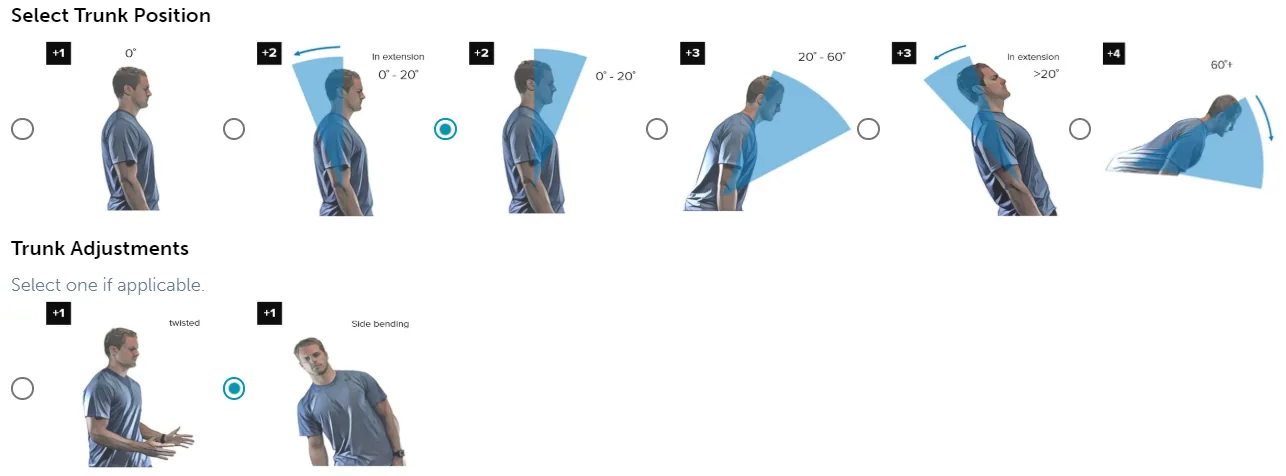
The trunk position score will be between 1-5. The score is based on the degree of trunk flexion or extension, along with any adjustment for twisting or side bending (lateral flexion) of the trunk/back. Trunk flexion is defined as anterior (forward) movement of the trunk in the sagittal plane (think toe touching).
Trunk extension is defined as posterior (backward) movement of the trunk in the sagittal plane.
In this example, trunk flexion is less than 20 degrees (+2). When viewed from behind, the trunk was in a side bending position so the side bending adjustment is selected (+1), for a trunk score of 3.
Step 3: Legs
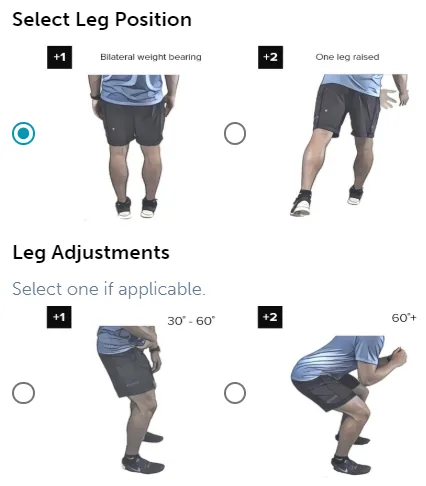
The leg position score will be between 1-4. The score is based on bilateral or unilateral weight bearing on the legs, along with any adjustment for the degree of knee flexion. Knee flexion is defined as bending or decreasing the angle between the femur and tibia bones of the limb at the knee joint.
In this example, there is bilateral weight bearing on the legs (+1). Because the knees are not flexed, no leg adjustment is applicable.
Step 4: Table A posture score. Look up the neck (1), trunk (3) and leg (1) scores in Table A on the worksheet. In this example, the Table A posture score is 2.
Force/load analysis
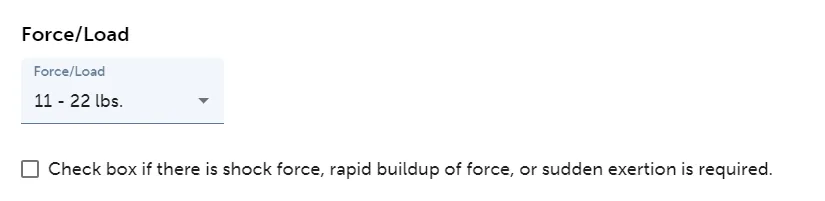
Step 5: Force/load. The force/load score will be between 0-3. For this selection you will need to determine the load or force required to perform the task. Often, you can obtain the weight of the load from company production or shipping records. If necessary, use the nearest scale in the facility or a force measurement gauge to determine the exact weight of any load being moved or lifted.
In this example, the load being lifted is 11-22 lbs (+1). There is no shock force, rapid buildup of force, or sudden exertion required by this task.
Step 6: Score A. Add the Table A posture score and the force/load score: 2 + 1 = 3.
Upper arm, lower arm and wrist analysis
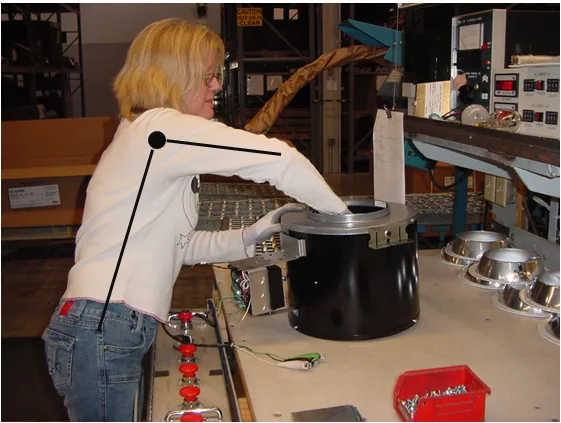
Step 7: Upper arm
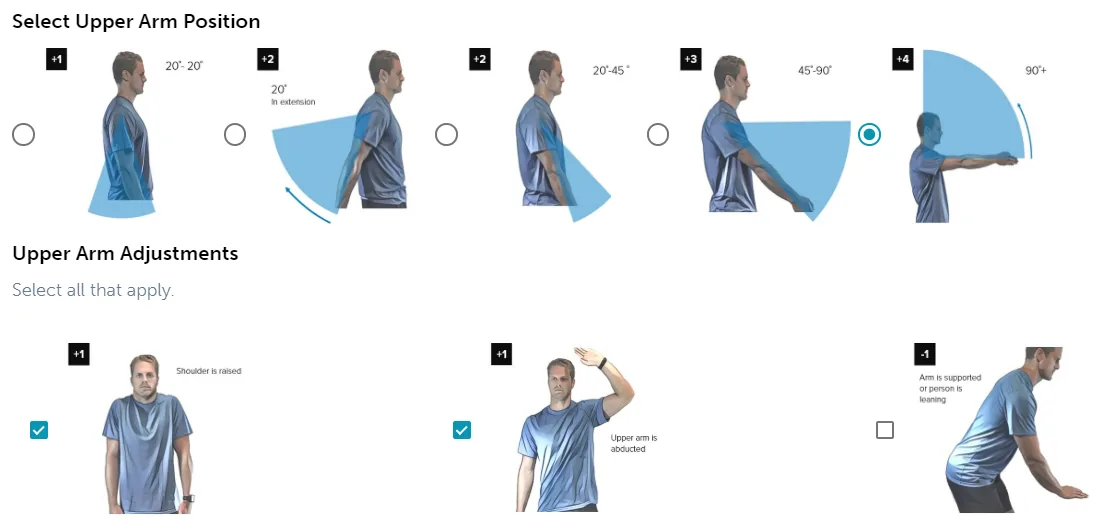
The upper arm position score will be between 1-6. The score is based on the degree of shoulder flexion or extension, along with any adjustment for the shoulder being raised and/or abducted. Shoulder flexion is defined as anterior movement of the upper arm in the sagittal plane (forward reaching). Shoulder extension is defined as posterior movement of the upper arm in the sagittal plane (backward reaching). Shoulder abduction is defined as sideways movement of the upper arm away from the body.
In this example, the right upper arm is raised more than 90 degrees for a score of +4. Two adjustments are added because the shoulder is raised (+1) and the upper arm is abducted (+1), for an upper arm score of 6.
Step 8: Lower arm
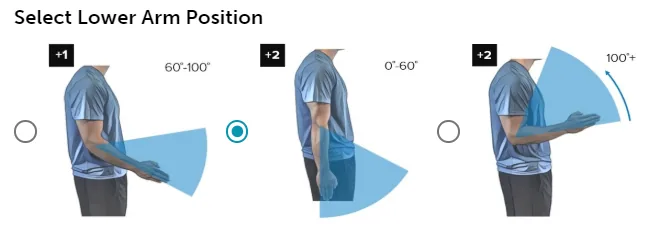
The lower arm position score will be 1 or 2. The score is based on the degree of elbow flexion or bending.
In this example, the elbow is flexed less than 60 degrees (+2).
Step 9: Wrist
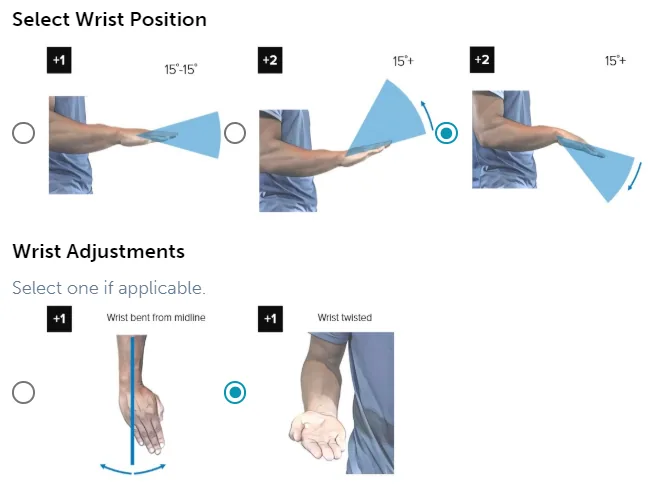
The wrist position score will be 1-3. The score is based on the degree of wrist flexion or extension, along with an adjustment of +1 for wrist deviation or twisting.
In this example, the wrist is flexed more than 15 degrees (+2). The wrist is also twisted, so under wrist adjustments select wrist twisted for an adjustment of +1, for a wrist score of 3.
Step 10: Table B posture score. Look up the upper arm (6), lower arm (2) and wrist (3) scores in Table B on the worksheet. In this example, the Table B posture score is 9.
Coupling analysis
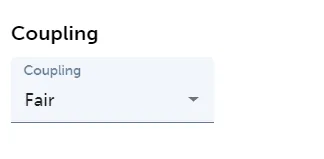
Step 11: Coupling. The coupling score will be between 0-3. Select Good (+0) when there’s a well-fitting handle and a mid-range power grip, Fair (+1) when the hand hold is acceptable but not ideal or coupling is acceptable with another body part, Poor (+2) when the hand hold is not acceptable but possible, and Unacceptable (+3) when there are no handles and the grip is awkward or unsafe with any body part.
In this example, the coupling was determined to be Fair (+1).
Step 12: Score B. Add the Table B posture score and the coupling score: 9 + 1 = 10.
Activity score
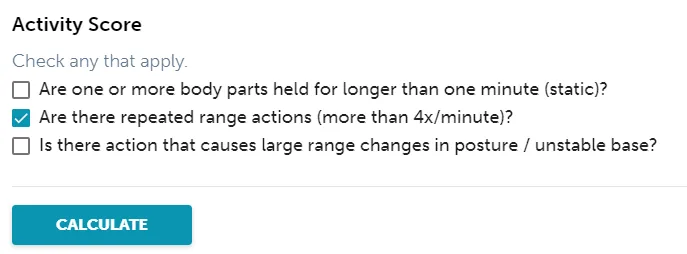
Step 13: Activity. The activity score will be between 0-3. Add +1 for each of these that applies: one or more body parts are held for longer than one minute (static), repeated small range actions occur more than 4 times per minute, or the action causes rapid large range changes in posture or an unstable base.
In this example, repeated small range actions (more than 4x per minute) are required, for an activity score of +1.
Calculate results
Find the Table C score where the Score A row (3) meets the Score B column (10). In this example, the Table C score is 8. Add the activity score to get the final REBA score: 8 + 1 = 9.
| Step | Score |
|---|---|
| Table A posture score (neck 1, trunk 3, legs 1) | 2 |
| Score A (Table A plus force/load 1) | 3 |
| Table B posture score (upper arm 6, lower arm 2, wrist 3) | 9 |
| Score B (Table B plus coupling 1) | 10 |
| Table C score | 8 |
| Activity score | +1 |
| REBA score | 9 (high risk) |
| Risk index (9 ÷ 4) | 2.25 |
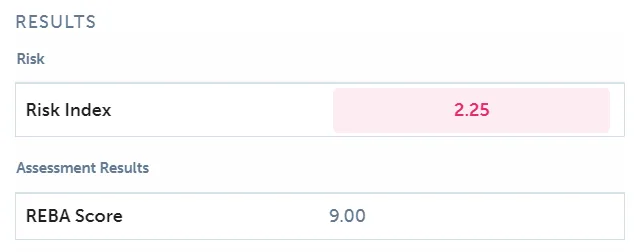
The REBA score represents the level of MSD risk for the job task being evaluated. The minimum REBA Score = 1, and the maximum REBA Score = 15. The design goal for the REBA assessment is a score of 4. The Risk Index answers the question… “How significant is the risk?” A Risk Index value of 1.0 or less indicates a nominal risk to healthy employees. A Risk Index greater than 1.0 denotes that the task is high risk for some fraction of the population. As the Risk Index increases, the level of MSD risk increases correspondingly. Therefore, the goal is to design job tasks to accomplish a Risk Index of 1.0 or lower.
In this example, the final REBA score of 9 and a risk index of 2.25 indicate high risk and call for further investigation with engineering and/or work method changes to reduce or eliminate MSD risk. See this example in the free REBA calculator.
REBA vs RULA
REBA and RULA were both co-developed by Lynn McAtamney and use the same worksheet approach. The difference is how much of the body they score, so pick the one that matches where the work happens.
| REBA | RULA | |
|---|---|---|
| Full name | Rapid Entire Body Assessment | Rapid Upper Limb Assessment |
| Published | Hignett and McAtamney, 2000 | McAtamney and Corlett, 1993 |
| Body parts scored | Neck, trunk, legs, upper arms, lower arms and wrists | Upper arms, lower arms, wrists, neck and trunk, with a simple leg score |
| Also scores | Load, coupling (grip) and activity | Muscle use and load |
| Final score | 1 to 15, five risk levels | 1 to 7, four action levels |
| Best for | Whole-body tasks, handling loads, and unstable or rapidly changing postures | Work done mainly with the arms and hands, such as assembly or computer work |
To score a task with RULA, see our step-by-step guide to RULA or try the free RULA calculator.
FAQ
Common questions about REBA
What does REBA stand for?
REBA stands for Rapid Entire Body Assessment. It is an observational ergonomic assessment tool that scores the risk of musculoskeletal disorders from a worker’s posture, the load handled, the grip and the type of activity, and gives a single score from 1 (negligible risk) to 15 (very high risk).
Who developed REBA?
REBA was developed by Sue Hignett and Lynn McAtamney and published in Applied Ergonomics in 2000. It builds on RULA, which McAtamney published with Nigel Corlett in 1993. The worksheet in this guide is based on the version developed by Dr. Alan Hedge.
What are Tables A, B and C in REBA?
Table A combines the neck, trunk and leg scores into one posture score. Table B combines the upper arm, lower arm and wrist scores into another. Table C combines Score A (the Table A score plus the force/load score) with Score B (the Table B score plus the coupling score), and the activity score is added to the result to give the final REBA score.
What is the REBA risk index?
The risk index is the REBA score divided by 4. ErgoPlus uses it so a REBA result can be read on the same scale as the NIOSH lifting index: a risk index of 1.0 or lower (a REBA score of 4 or lower) is the design goal, and anything above 1.0 means the task is high risk for some workers.
How long does a REBA assessment take?
Once you have chosen the posture to score, a REBA assessment takes a few minutes. Most of the time goes into observing the task and measuring the body angles, and photos or video of the task make that faster and more accurate. The free REBA calculator does the table lookups for you.
Can REBA be used for seated work?
Yes. Sitting is scored like standing with both legs bearing weight (+1) in step 3, so REBA works for seated tasks. For seated work done mainly with the arms and hands, such as assembly or computer work, RULA is often a better fit because it scores the upper limbs in more detail.
When should I use the NIOSH Lifting Equation or the Snook Tables instead of REBA?
REBA scores posture. When the main risk is the weight being lifted or lowered, the NIOSH Lifting Equation gives a recommended weight limit and a lifting index. For pushing, pulling and carrying, use the Snook Tables. Many assessments use REBA alongside one of these tools.
Is there a REBA worksheet PDF?
Yes. Download the REBA Employee Assessment Worksheet (PDF) to score a task by hand, or use the free REBA calculator, which follows the same steps and prints a one-page summary.
References
- Hignett, S., & McAtamney, L. (2000). Rapid Entire Body Assessment (REBA). Applied Ergonomics, 31(2), 201–205. https://doi.org/10.1016/S0003-6870(99)00039-3
- McAtamney, L., & Corlett, E. N. (1993). RULA: a survey method for the investigation of work-related upper limb disorders. Applied Ergonomics, 24(2), 91–99. https://doi.org/10.1016/0003-6870(93)90080-S
- REBA Employee Assessment Worksheet. Original worksheet developed by Dr. Alan Hedge, based on Hignett and McAtamney (2000).
Free Download: Step-by-Step Guides to Recommended Ergonomic Assessment Tools
Learn how to conduct fast and accurate assessments using the most popular ergonomic assessments tools.
 Please fill out the form below and we’ll email a link to your resources right away.